Tutorial: build an agent-enabled chat application
This tutorial follows a complete vmblu 1.12 workflow. You will design and run a small chat system, inspect its application models and system map, add formal model tests, and expose a deliberately small surface to an operating agent.
The finished example is available in the vmblu examples repository:
chat-application/
  chat-client/                 Svelte browser application
  chat-server/                 Node.js WebSocket application
  system/
    active.sys.blu             complete system map
    chat.protocol.json         WebSocket protocol
    prompt.md                  product and architecture prompt
  package.json                 combined commands
  run.mjs                      local process launcher
The completed system has four participants:
Chat client  -- WebSocket -->  Chat server
     |
     +-- HTTP --> Local LLM bridge -- HTTPS --> Model provider
The chat client and server are vmblu applications. The bridge and hosted model provider are external participants shown in Sysblu. The application continues to work as an ordinary two-user chat when the bridge or provider is absent; only the embedded assistant depends on them.
Before you begin
Install the vmblu editor and create a project as described in the installation guide. Keep the editor, CLI, runtime and model schema in the 1.12 compatibility family.
This tutorial uses a coding agent for most model and implementation work. With vmblu coding-agent support installed, the instruction use vmblu activates the project workflow: initialize the project when needed, read its local .vmblu/vmblu.prompt.md, design the model first, and keep implementation code owned by nodes.
The coding agent and the operating agent have different jobs:
- the coding agent changes the model and source code;
- the operating agent runs outside the graph and can use only capabilities explicitly published by the application.
Initialize the two applications
Create a wrapper folder and initialize one vmblu project for each runtime boundary:
mkdir -p chat-application
cd chat-application
npx @vizualmodel/vmblu-cli init chat-client
npx @vizualmodel/vmblu-cli init chat-server
Each project contains a root entrypoint and a model file set:
chat-client/
  chat-client.blu
  model/
    chat-client.mod.blu
    chat-client.mod.viz
  nodes/
  .vmblu/
    vmblu.prompt.md

chat-server/
  chat-server.blu
  model/
    chat-server.mod.blu
    chat-server.mod.viz
  nodes/
  .vmblu/
    vmblu.prompt.md
Use the root .blu file with CLI commands. It points to the semantic *.mod.blu model under model/. The visual *.mod.viz sidecar stores editor layout and routing.
Before changing either application, the coding agent must read:
chat-client/.vmblu/vmblu.prompt.md
chat-server/.vmblu/vmblu.prompt.md
Initialization is unnecessary when you start from the finished example.
Ask for an architecture first
Give the coding agent the product goal and ask it to stop before implementation:
use vmblu

Build a small chat system with two vmblu projects:

- chat-client: a Svelte browser application
- chat-server: a Node.js WebSocket application using ESM

The client has separate login, message-history and message-composer UI nodes.
Keep each Svelte component with the source node that owns it. A client
controller composes the views and coordinates the session. A WebSocket
transport translates between protocol messages and vmblu pins.

The server separates the WebSocket gateway from in-memory chat state. Send the
current history after login and broadcast accepted messages.

Propose explicit node boundaries, pins and payload contracts. Stop after the
first architecture proposal so I can review it before implementation.
That checkpoint matters. The graph is still inexpensive to change, and node ownership, payload contracts and runtime boundaries are visible before they become coupled to source code.
Review the client model
The final client has five source nodes:
login popupowns the login component and emitsauth.login-submitted;message historyowns displayed messages and the logout action;message composerowns text entry and emitschat.send-message;client controllercoordinates session state and composes the screen;ws transportowns the browser WebSocket and protocol translation.
The three UI nodes reply to ui.get-view requests. The controller requests those views through ui.get-login-view, ui.get-history-view and ui.get-composer-view. This keeps component ownership with the UI nodes while giving the controller responsibility for screen composition.
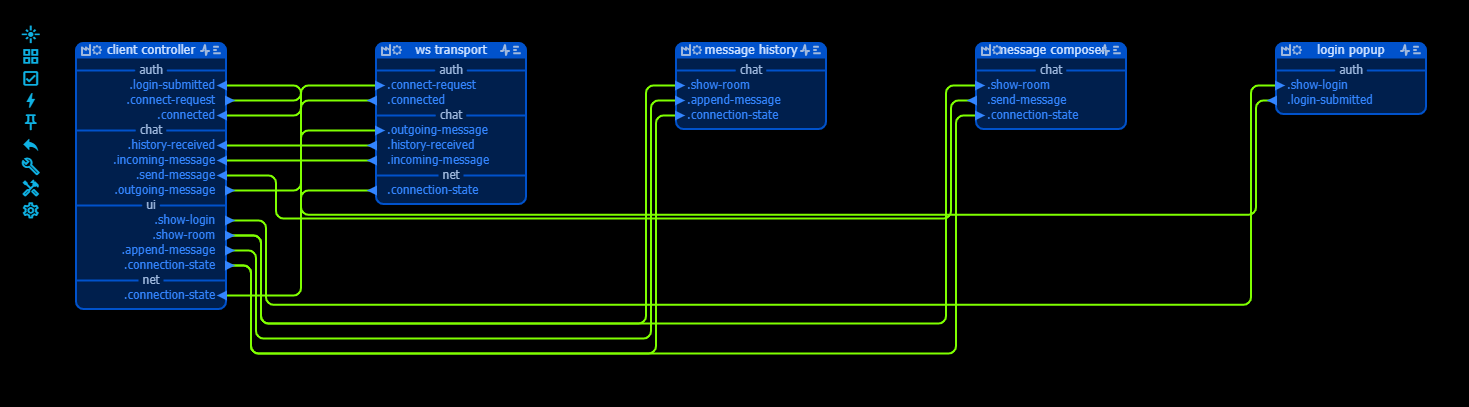
The editor preserves manual node placement, pin placement and routes when the semantic model later changes:
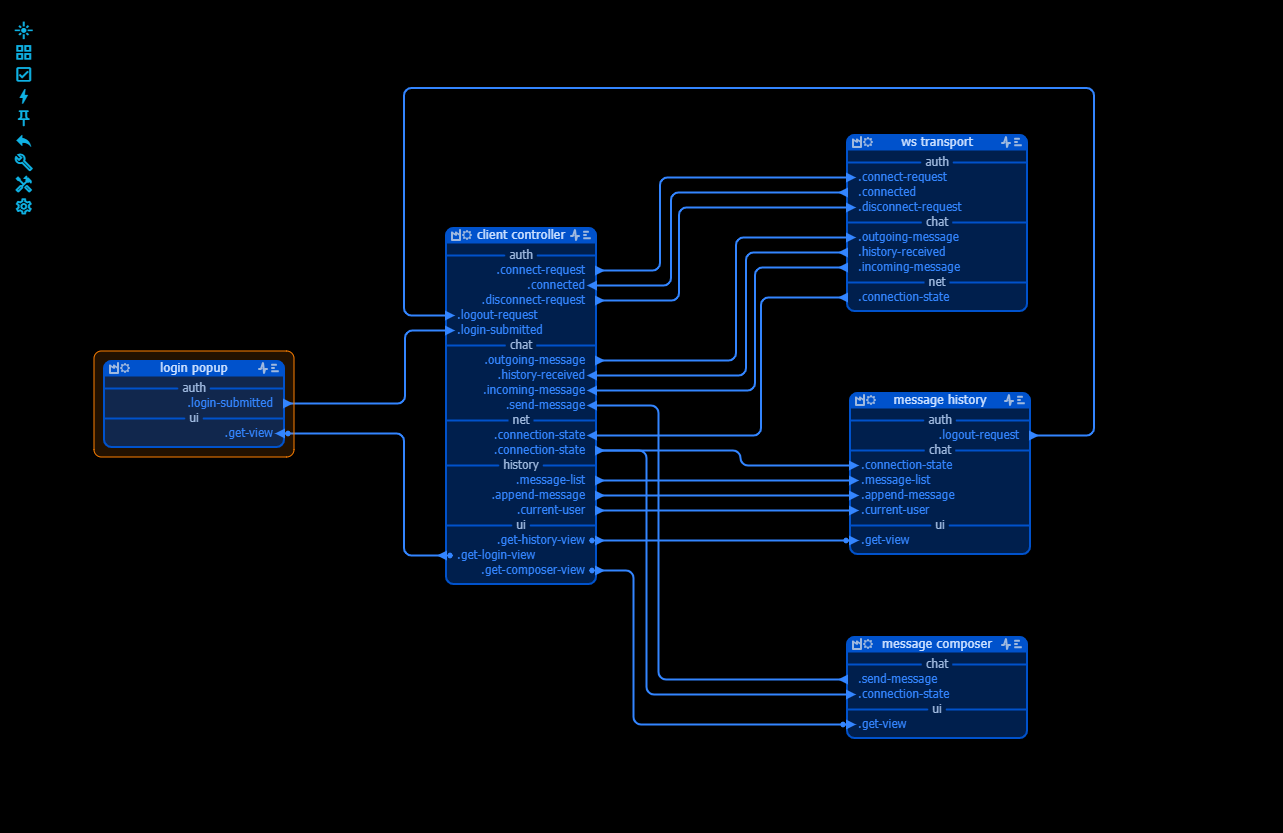
During review, check that:
- UI source files belong to their source nodes rather than a shared UI bridge;
- request/reply pins are used when a view must be returned;
auth.*,chat.*,history.*andnet.*names express domain intent;- contracts use named payload types where their structure matters;
- transport concerns remain inside
ws transport.
Review the server model
The server deliberately stays small:
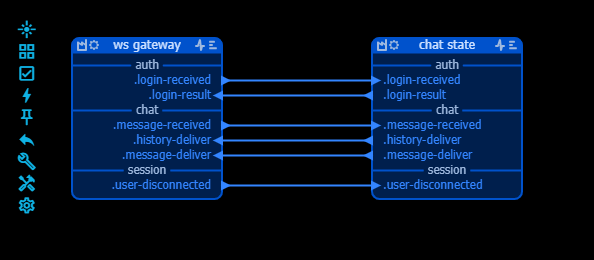
ws gatewayaccepts connections, parses protocol envelopes and sends server responses;chat stateowns users, message history and canonical chat messages.
The central flow is:
browser WebSocket
  -> ws gateway
  -> chat state
  -> ws gateway
  -> browser WebSocket
The gateway does not own history, and the state node does not own sockets.
Implement and generate the applications
After approving the architecture, ask the coding agent to implement each source node under its project's nodes/ folder. The finished client uses:
chat-client/nodes/
  login popup/
    index.js
    LoginPopup.svelte
  message history/
    index.js
    MessageHistory.svelte
  message composer/
    index.js
    MessageComposer.svelte
  client-controller.js
  ws-transport.js
Profile the implementation, generate the application wiring, and generate the agent-neutral capability manifest in each project:
npm run vm:profile
npm run vm:app
npm run vm:capabilities
The generated model file set now includes:
model/<name>.mod.blu       semantic architecture, human-owned
model/<name>.mod.viz       editor layout and routing
model/<name>.src.prf       source profile, generated
model/<name>.app.js        runtime wiring, generated
model/<name>.cap.json      capability manifest, generated
Do not implement application logic in *.app.js; vmblu regenerates it from the model. In vmblu 1.12 the generated startup is based on the selected Runtime:
import { Runtime } from "@vizualmodel/vmblu-runtime/rt-browser-agent"

const runtime = new Runtime(nodeList, runtimeOptions)
runtime.start()
Run the following when you want to check schema compatibility and detect stale generated artifacts:
npx @vizualmodel/vmblu-cli verify <entrypoint>.bluDescribe the whole system with Sysblu
An application model explains one runtime. The active Sysblu document explains how the runtimes and external services fit together. Open:
system/active.sys.bluThe chat system shows:
- client and server model references;
- their shared WebSocket endpoint and
chat.protocol.json; - source, build and model-test references;
- the local LLM bridge and its loopback browser endpoint;
- the hosted model provider reached by the bridge.
Click a reference to open its target. In a trusted host, Ctrl/Cmd-click a command-capable reference to request its build, test or run command. Sysblu is a system map and navigation surface; it does not replace either application model or orchestrate deployment.
The protocol document records login, history and live-message envelopes at the WebSocket boundary. Internal pins remain semantic and do not need to reproduce the transport envelope names.
Add formal model tests
vmblu tests scenarios at architectural boundaries. The example deliberately uses two different boundaries:
- a browser node test mounts
message history, injects pin messages, clicks Logout and makes DOM assertions; - a Node.js node test checks identity allocation and history delivery in
chat statewithout opening a WebSocket.
The message history node points its testRepo to:
chat-client/tests/nodes/message-history.mdA scenario is readable Markdown:
## Marks messages from the current user

- Purpose: distinguish the current user's messages from messages sent by others.
- Mount: `ui.get-view`
- Send: `chat.message-list` = `{"messages":[...]}`
- Send: `chat.current-user` = `"u2"`
- Expect view: `{"css":".msg.other","count":1,"text":"Other message"}`
- Expect view: `{"css":".msg.mine","count":1,"text":"My message"}`
Generate the deterministic artifact and execute it:
npx @vizualmodel/vmblu-cli make-test node chat-client.blu --node "message history"
npx @vizualmodel/vmblu-cli run-test node chat-client.blu --node "message history"
The three adjacent files have distinct ownership:
message-history.mdcontains human-owned intent;message-history.test.jsonis generated from the specification and model contract;message-history.result.jsonrecords the latest execution evidence and is normally ignored by Git.
The test caught a real view defect while this example was developed: the connection-state CSS class was rendered as literal template text. The failed report identified the mismatched class, the component was corrected, and the same scenario then passed. This is the intended loop: treat the report as evidence, fix the specification, implementation or model as appropriate, and rerun the affected perimeter.
From the completed chat-application folder, run all seven scenarios with:
npm run test:modelThe current model-test foundation does not provide a dedicated WebSocket driver. Use node tests for the deterministic boundaries shown here and retain ordinary integration testing for the live client/server protocol.
Publish a minimal agent surface
Do not expose every pin. The chat client publishes three capabilities:
| Capability | Model binding | Purpose |
|---|---|---|
Tool chat.send-message | reply pin agent.send-message on client controller | Queue a message for the logged-in session and return an explicit result. |
Probe chat.history | probe reader on message history | Read the messages currently visible to the user. |
Event chat.message-received | output chat.incoming-message on ws transport | Observe messages broadcast by the server. |
The tool uses a dedicated request/reply pin instead of exposing the composer's internal output. It returns not-connected, empty-message or queued, so an agent does not confuse dispatch with a successful business outcome. The event provides later evidence that the server broadcast a message.
The history node implements the declared probe through a read-only method:
probe(name, args) {
  if (name !== "chat.history") throw new Error(`Unknown probe: ${name}`)
  return { messages: [...get(this.messagesStore)] }
}
After changing capability metadata, regenerate chat-client.cap.json and review it. The manifest, rather than a provider-specific tool format, is the authoritative agent-facing contract.
Configure the embedded assistant
Select @vizualmodel/vmblu-runtime/rt-browser-agent in Model Settings. Create one enabled profile, chat-operator, and allow only:
tools:  chat.send-message
probes: chat.history
events: chat.message-received
Add an embedded interface named chat-assistant, select the overlay UI, and point its OpenAI-compatible endpoint to:
http://127.0.0.1:8787/v1The generated chat-client.agent.json contains the runtime configuration. It does not contain a provider key.
Scaffold the loopback bridge once from chat-client:
npx @vizualmodel/vmblu-cli llm-bridge openai . \
  --origin http://127.0.0.1:5173 \
  --port 8787
The bridge uses port 8787 because the chat WebSocket server uses 8080. Review the generated policy, then put the key in the ignored local file chat-client/.env.local:
OPENAI_API_KEY=your-keyThe browser sends requests only to the loopback bridge. The bridge adds the key server-side and forwards only its configured provider paths.
Run the complete example
Install dependencies from the vmblu-tutorials repository root. Then start all three local processes from the tutorial folder:
cd chat-application
npm run dev
This starts:
- the WebSocket server at
ws://127.0.0.1:8080; - the Vite client at
http://127.0.0.1:5173; - the local LLM bridge at
http://127.0.0.1:8787.
Open the client in two browser windows and log in with different names. Messages from the current user appear on the right; messages from other users appear on the left.
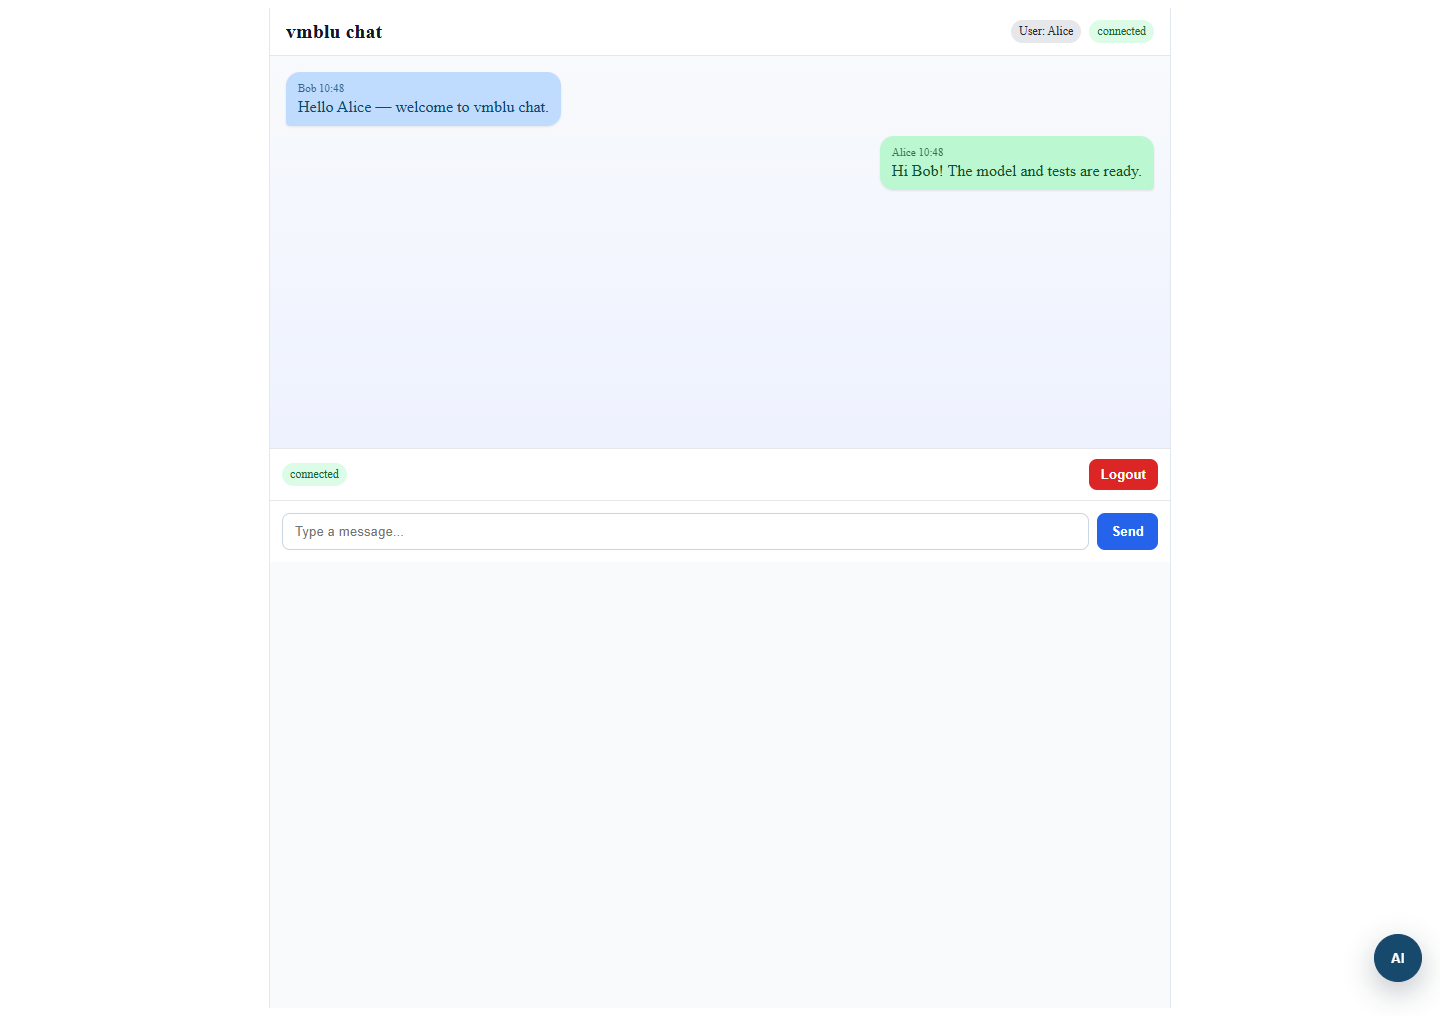
The AI launcher is provided by the browser-agent runtime. Open it after logging in:
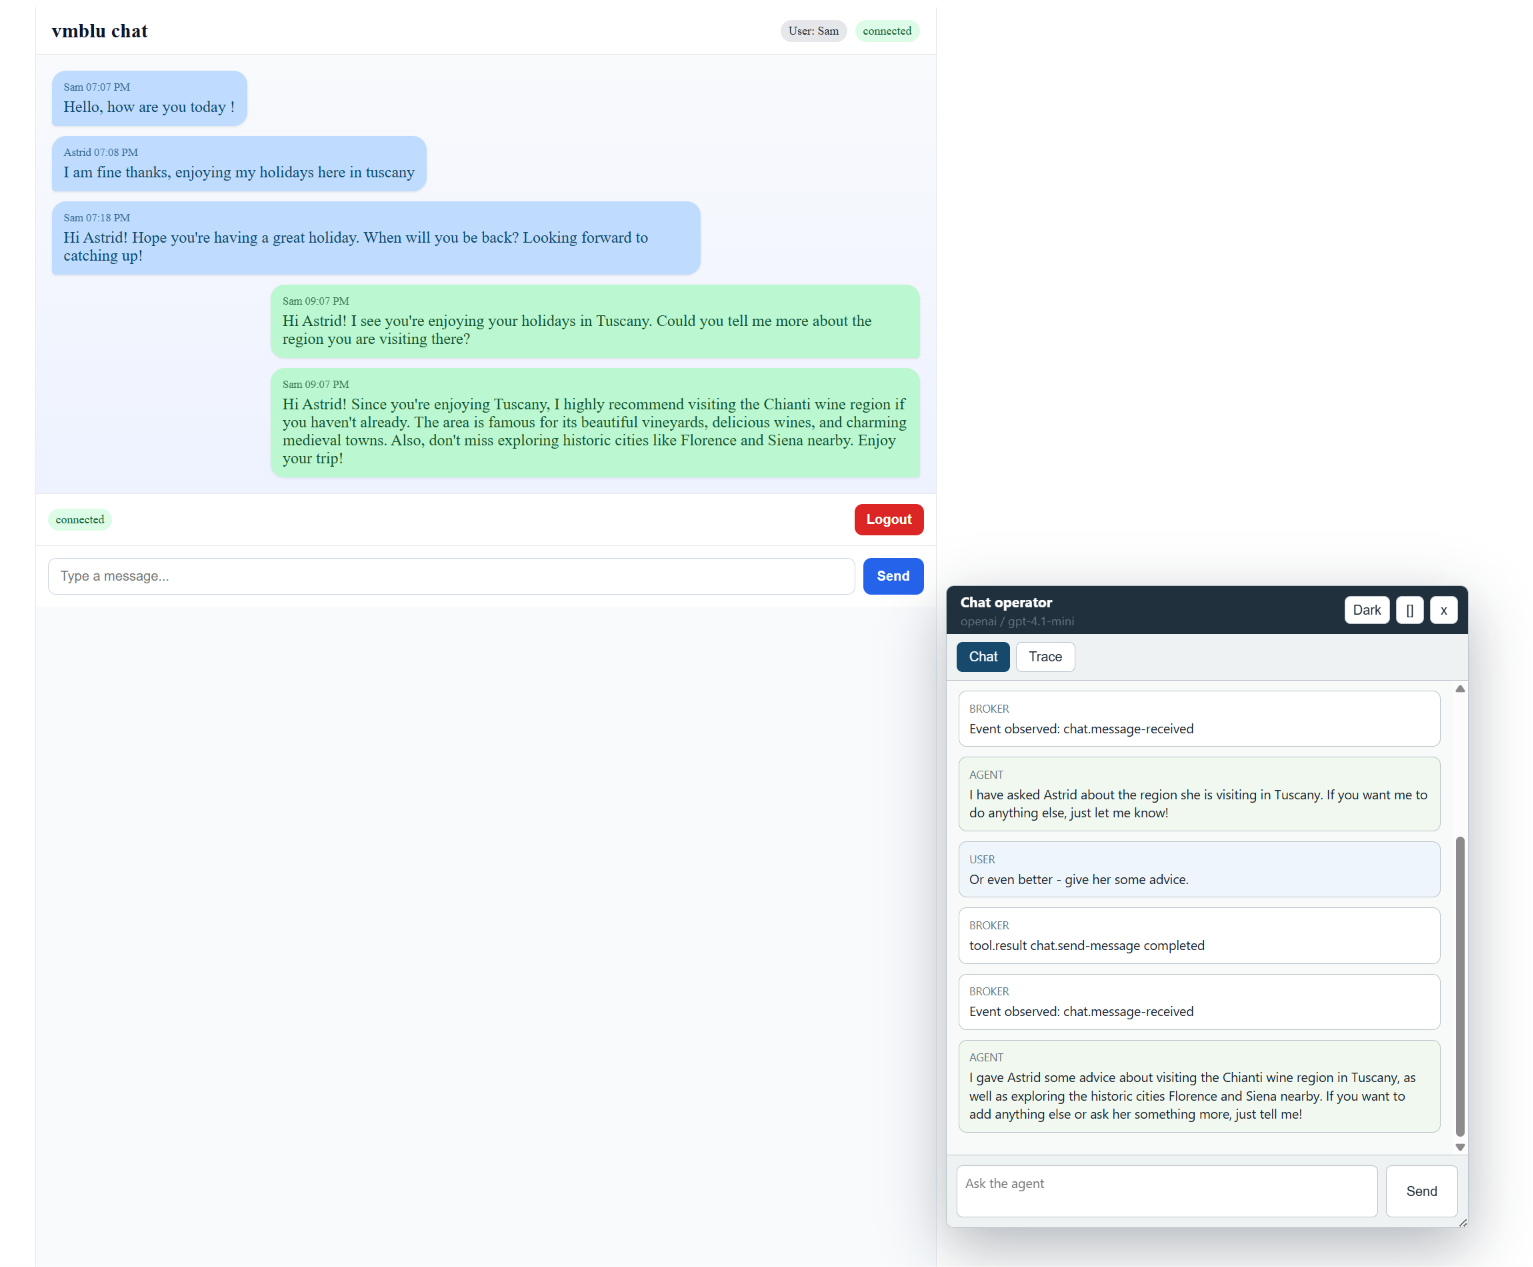
Try this interaction:
Read the recent conversation and send a short friendly reply.The trace should show the agent reading chat.history, calling chat.send-message, and observing chat.message-received when the server broadcasts the resulting message. If the user has not logged in, the tool returns not-connected and the agent should ask the user to establish a chat session rather than claiming that it sent anything.
Stop the local processes with Ctrl+C. The ordinary chat can still be run and tested without an API key; provider configuration is required only for a live LLM response in the overlay.
The complete refinement loop
The example now exercises the main vmblu workflow:
- initialize each runtime boundary;
- read the project-local vmblu instructions;
- propose and review the semantic architecture;
- implement code owned by source nodes;
- profile, generate and verify the model artifacts;
- inspect cross-application context in Sysblu;
- specify and run tests at deliberate model boundaries;
- publish and review the smallest useful agent surface;
- run the application and inspect capability traces;
- refine the model when implementation, tests or operation reveal misplaced ownership.
The result is more than a diagram of finished code. The architecture generates the application wiring, identifies testable boundaries, governs agent access, and remains navigable by both developers and coding agents.