Tutorial
Introduction
This tutorial builds a small chat application with vmblu. The app is simple enough to follow, but not so small that architecture is irrelevant: it has a browser client, a Node.js server, login and logout state, message history, user-specific message rendering, and a WebSocket transport.
The finished example lives in:
examples/chat-application/
  chat-client/
  chat-server/
  prompt.md
  run.sh
The tutorial is written as the workflow you would give to a coding agent. The important point is not that every prompt must be copied exactly. The important point is the shape of the work:
- Initialize vmblu projects.
- Read the project-local vmblu prompts.
- Design the model before writing node code.
- Keep implementation code allocated to nodes.
- Generate and verify the application from the model.
Application Goal
The chat application has two vmblu projects:
chat-client: a browser application using Svelte for UI components.chat-server: a Node.js WebSocket server.
The user can log in with a name, send messages, see message history and log out. Messages from the current user are rendered differently from messages sent by other users.
For this first tutorial we verify the generated apps directly, but we do not build the formal vmblu test model. The testing workflow is covered separately in the testing guide.
Initialize The Projects
In normal use you do not have to initialize the projects yourself. If vmblu agent support is installed, a short instruction such as use vmblu tells the coding agent to follow the vmblu workflow. The agent can then create the wrapper folder, run vmblu init for both sub-projects and read the generated project-local prompts before changing the app.
A concise prompt is enough:
use vmblu

Create a chat application in examples/chat-application with two vmblu projects:

- chat-client
- chat-server

Initialize both projects if they do not exist yet, then read each project's
.vmblu/vmblu.prompt.md before making architecture or code changes.
The initialization commands the agent will normally run are:
mkdir -p examples/chat-application
cd examples/chat-application
vmblu init chat-client
vmblu init chat-server
If vmblu is not on PATH, the agent can use the package command instead:
npx @vizualmodel/vmblu-cli init chat-client
npx @vizualmodel/vmblu-cli init chat-server
After initialization, each project has a root entrypoint and a model file set:
chat-client/
  chat-client.blu
  model/
    chat-client.mod.blu
    chat-client.mod.viz
  nodes/
  .vmblu/
    vmblu.prompt.md

chat-server/
  chat-server.blu
  model/
    chat-server.mod.blu
    chat-server.mod.viz
  nodes/
  .vmblu/
    vmblu.prompt.md
The root .blu file is the entrypoint to use with CLI commands. The actual model lives in model/.
The agent should report that it has read the generated vmblu prompt files:
Read:

- examples/chat-application/chat-client/.vmblu/vmblu.prompt.md
- examples/chat-application/chat-server/.vmblu/vmblu.prompt.md

Use each root .blu entrypoint to find the model file in model/.
Do not put general application code outside nodes/ unless explicitly asked.
Starting Prompt
You can also give the full product prompt in one go. With vmblu agent support installed, use vmblu activates the workflow; the rest of the prompt can focus on what the application should do:
use vmblu

We are building a small chat application.

There are two projects under examples/chat-application:

- chat-client: browser app, generated from chat-client.blu
- chat-server: Node.js WebSocket app, generated from chat-server.blu

Please stop after the first architecture proposal so I can review
the model before implementation.

Client requirements:

- Use Svelte for UI.
- The login popup, message history and message composer are separate source nodes.
- If a node has UI, its Svelte component lives in that node's own folder.
- Do not create a shared UI folder or UI bridge.
- The client controller decides what is mounted on screen.
- UI nodes expose their view through request/reply pins.
- The user can log in, send messages, see history and log out.

Server requirements:

- Use ESM, not CommonJS.
- Use WebSockets.
- Keep users and message history in memory.
- Send history after login.
- Broadcast new messages to connected clients.
This prompt deliberately asks the agent to stop after architecture. That gives you a chance to inspect the model in the editor before code is written.
Client Architecture
The final client model uses five source nodes:
login popup: owns the login Svelte component and emitsauth.login-submitted.message history: owns the history Svelte component, renders messages and emitsauth.logout-request.message composer: owns the composer Svelte component and emitschat.send-message.client controller: coordinates login state, requests UI views and mounts them in the document.ws transport: owns the browser WebSocket connection and maps protocol messages to vmblu pins.
The UI nodes each expose a reply pin named ui.get-view. The controller has matching request pins:
ui.get-login-viewui.get-history-viewui.get-composer-view
That pattern is important. The UI node owns its component and DOM element, while the controller owns the screen composition. Showing and hiding views is then ordinary controller logic, not a set of extra graph messages.
The vmblu editor has automatic placement of nodes, based on connectivity between the nodes, and automatically routes the wires between pins that are connected, without crossing the the nodes.
A generated or agent-created model layout is mechanically correct but not always the most pleasing to the eyes. By rearranging nodes, moving interfaces and pins inside the nodes and rerouting wires, a more esthetic version of the layout can be obtained.
Any changes that you make to the model in terms of node placement and routing are remembered, even if the agent modifies the model at later stages.
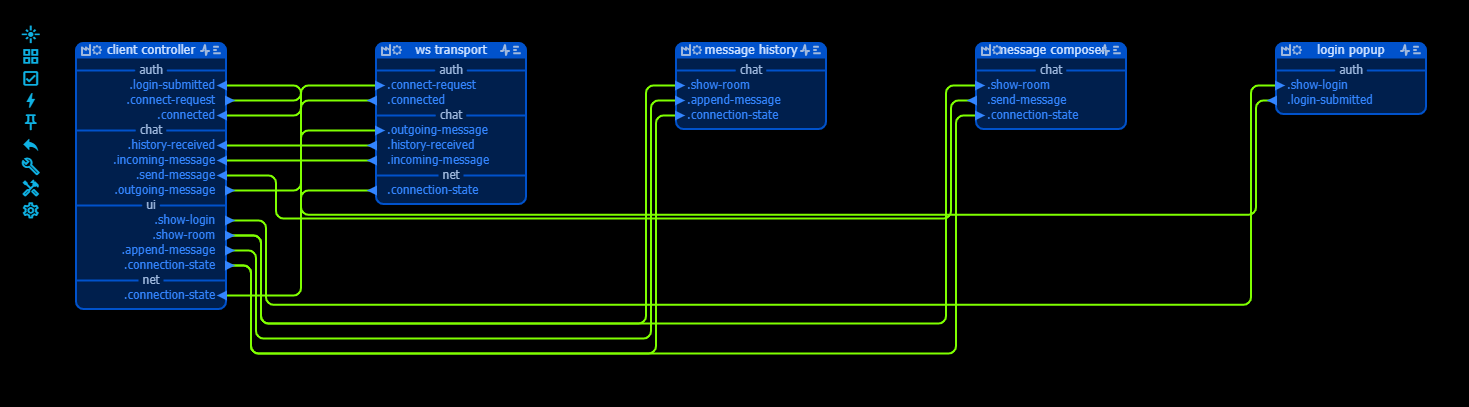
The editor is meant for exactly this kind of review. You can drag nodes, move pins and reroute connections until the diagram communicates the structure clearly:
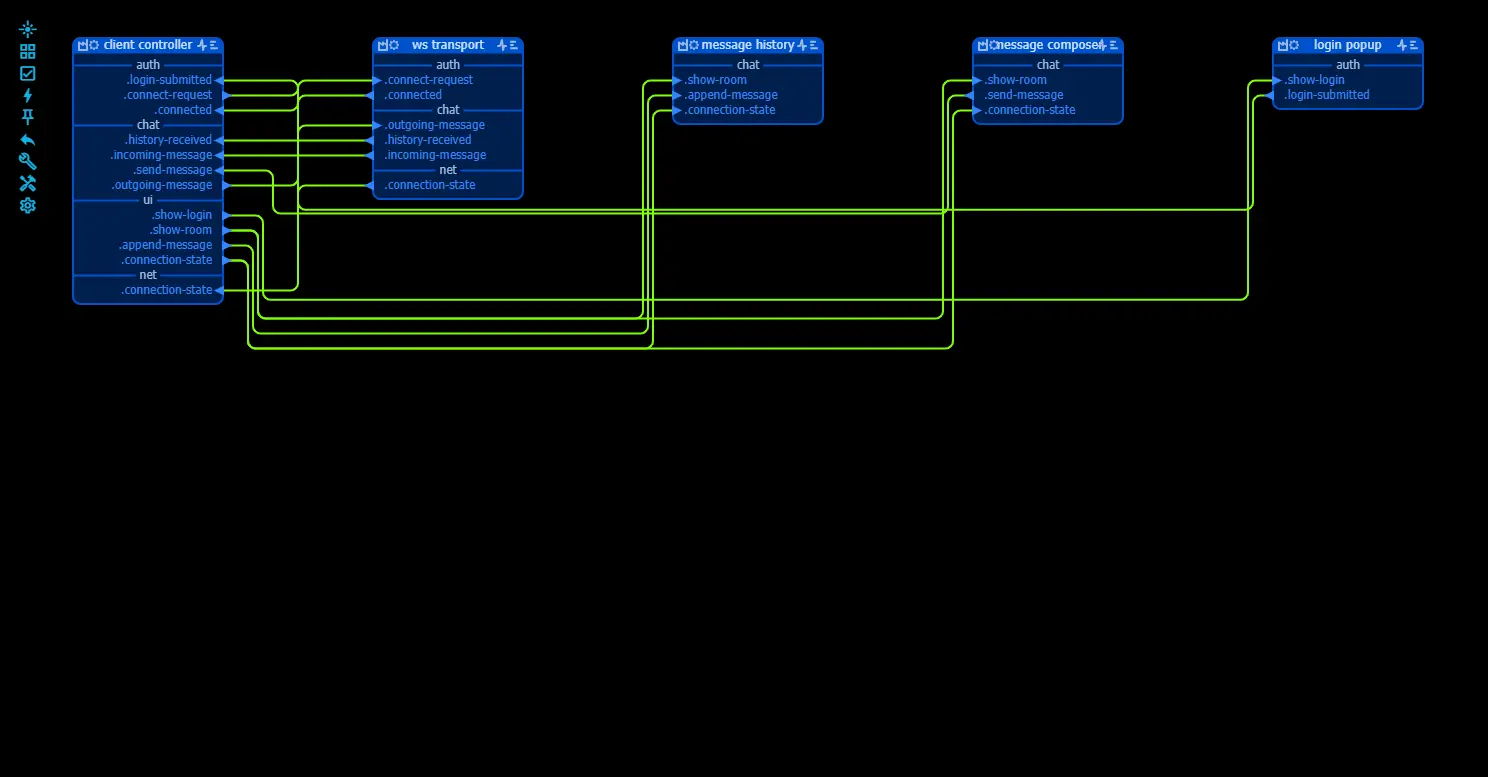
After this, the same architecture is easier to inspect:
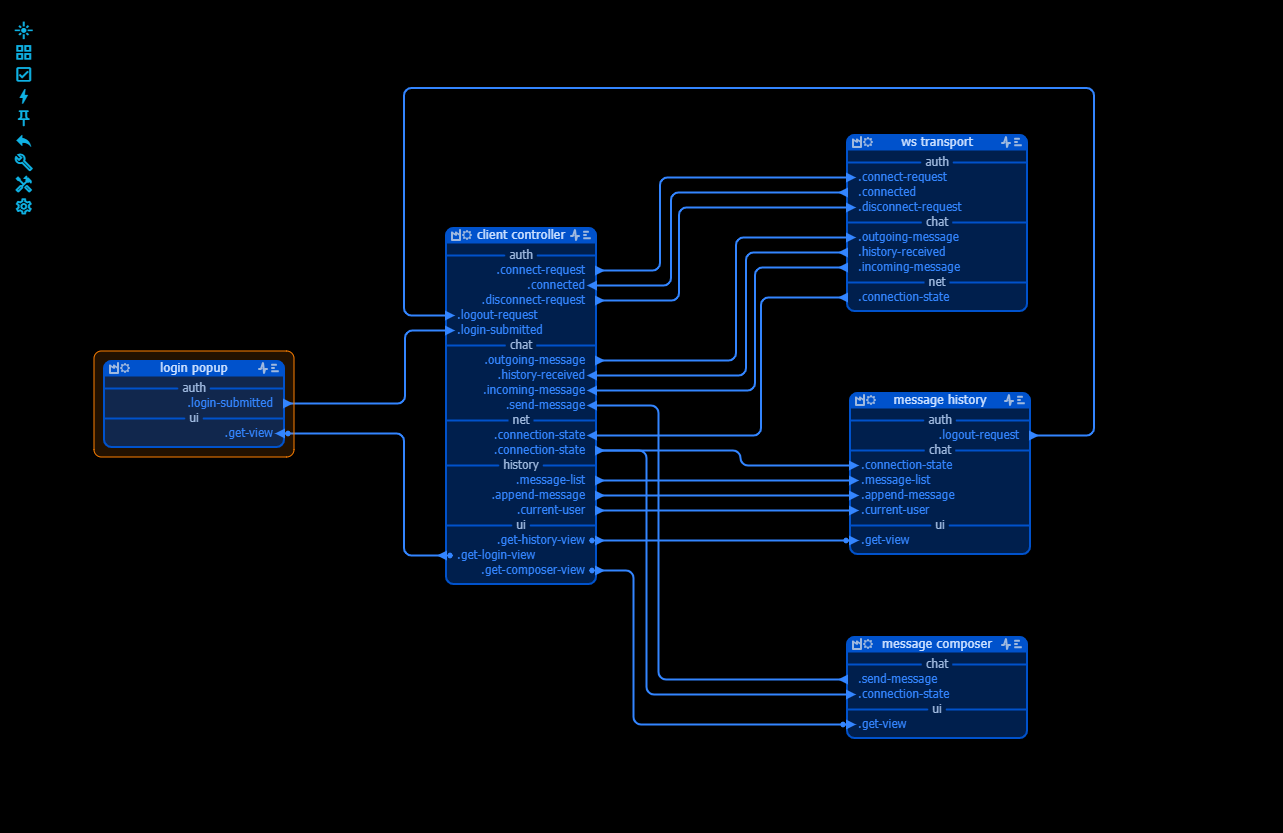
On this diagram you can already understand much of the logic of the application. You can click on pins, interfaces or nodes to follow how each is connected, you can look at the prompts for the nodes that the coding agent will use later when writing the code, and you can also inspect the message 'contracts' between pins.
The formal architecture is a good starting point to ask the agent for clarifications, changes etc. until you are satisfied with how the application looks. Also when the code has been written it is always possible to come back to the architecture and change it. Because of the structure, the agent has a good view on what has to be done to the code when architetcure is modified.
Server Architecture
The server model is intentionally small:
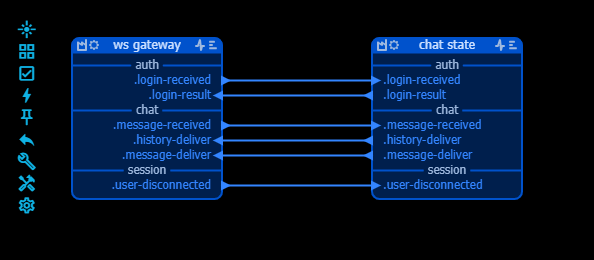
ws gateway: accepts WebSocket clients, parses browser messages and sends server responses.chat state: tracks users and message history, creates canonical chat messages and asks the gateway to deliver them.
The gateway does not own chat history. The state node does not own sockets. That split keeps transport and application state separate.
The central server flow is:
browser websocket
  -> ws gateway
  -> chat state
  -> ws gateway
  -> browser websocket
Nodes
As a convention, vmblu will store the code for the nodes in the /nodes folder. For simple nodes a single source file will be enough, complex nodes will be stored in a folder. You can deviate from this, or decide to have additional folders for common classes or types. If you do this, it is always a good practice to signal this to the agent in the /.vmblu/vmblu.prompt.md file.
When the architecture is completed and agreed, the agent(s) can start coding. Plural, because the structure of the archiecture and the clear interface contracts allow to wrie the code for the nodes in parallel. In our project this gave the following:
chat-client/nodes/
  login popup/
    index.js
    LoginPopup.svelte
  message history/
    index.js
    MessageHistory.svelte
  message composer/
    index.js
    MessageComposer.svelte
  client-controller.js
  ws-transport.js
Sometimes an agent will decide to organise code differently, but this is a vmblu design rule worth enforcing in prompts. A shared ui/ folder is tempting, but it hides ownership. If the login UI belongs to the login popup node, the component should live with that node.
In this example we have used svelte as our ui framework, but of course you can you use whatever you like.
Implementation
When the code is written, the vmblu cli has commands to profile the code and to build the application. Profiling is done automatically by the editor and is used to find all the handlers in the code that are linked to input pins and to find the locations where messages are actually sent by a node. This allows to easily navigate the code from the model and also to check that message contracts are respected. Whenever code changes, this profiling is done in the background to make sure it is never stale.
The agent knows about the vmblu commands he cas use to generate the application from the model. The app can also be generated by the user directly from within the vmblu editor itself. All these files form part of the 'model' and are saved in the /model folder. In this tutorial we have not used capabilities that define how an agent can interafec with the app to use it as a tool, but also the capabilities file is generated by the editor and stored in the model folder.
The generated application files are :
chat-client/model/chat-client.app.js
chat-server/model/chat-server.app.js
In that .app.js file you will find the list of nodes for the application and the call to the runtime to 'scaffold' and to start the app:
// ------------------------------------------------------------------
// Model: Root
// Path: /chat-client/model/chat-client.app.js
// Creation date 5/19/2026, 3:34:36 PM
// ------------------------------------------------------------------

// import the runtime code
import * as VMBLU from "@vizualmodel/vmblu-runtime/rt-base"

//Imports
import { createLoginPopupNode } from '../nodes/login popup/index.js'
import { createMessageHistoryNode } from '../nodes/message history/index.js'
import { createMessageComposerNode } from '../nodes/message composer/index.js'
import { createClientControllerNode } from '../nodes/client-controller.js'
import { createWsTransportNode } from '../nodes/ws-transport.js'

//The runtime nodes
const nodeList = [
//_________________________________________________LOGIN POPUP
{
name: "login popup",
uid: "dkXm",
factory: createLoginPopupNode,
inputs: [
  "=> ui.get-view"
  ],
outputs: [
  "auth.login-submitted -> auth.login-submitted @ client controller (lfTP)"
  ]
},

...

//________________________________________________WS TRANSPORT
{
name: "ws transport",
uid: "dZzM",
factory: createWsTransportNode,
inputs: [
  "-> auth.connect-request",
  "-> auth.disconnect-request",
  "-> chat.outgoing-message"
  ],
outputs: [
  "auth.connected -> auth.connected @ client controller (lfTP)",
  "chat.history-received -> chat.history-received @ client controller (lfTP)",
  "chat.incoming-message -> chat.incoming-message @ client controller (lfTP)",
  "net.connection-state -> net.connection-state @ client controller (lfTP)"
  ]
},
]

const agentRuntimeOptions = {}

// prepare the runtime
const runtime = VMBLU.scaffold(nodeList, [], agentRuntimeOptions)

// and start the app
runtime.start()
To run the application in the browser, the agent also creates an index.html file in which the browser entrypoint loads the generated client app directly:
<script type="module" src="./model/chat-client.app.js"></script>Run The Example
The example includes a helper script:
bash examples/chat-application/run.shIt starts:
- the generated server app with
node model/chat-server.app.js - the client dev server with Vite at
http://127.0.0.1:5173
Open the client URL in two browser windows, log in with two different names and send messages from both sessions.

What To Review In The Editor
Open chat-client.blu and inspect the model:
- Are the UI boundaries clear?
- Are request/reply pins used where a node asks another node for something?
- Are state-changing messages named by domain, such as
auth.*,chat.*,net.*andhistory.*? - Are payload contracts explicit enough?
- Is every implementation file owned by a node?
Then open chat-server.blu:
- Does the WebSocket gateway only handle transport?
- Does the chat state node own history and user state?
- Are messages between server nodes semantic rather than protocol-specific?
This review is the point of vmblu. The architecture is not just documentation after the fact; it is the source of the generated application wiring.
A Useful Refinement Loop
A good agent workflow for vmblu applications is iterative:
- Ask for a first architecture and stop.
- Review the node split in the editor.
- Ask for changes to the model before implementation.
- Approve the architecture.
- Write node code.
- Generate profile and app artifacts.
- Run the app.
- Refactor the model when the implementation reveals misplaced ownership.
In this chat app, the key refinement is the UI ownership rule. The final design avoids a shared UI layer. Instead, the UI components are node-owned and the controller composes them.
Result
The completed example demonstrates the core vmblu workflow:
- The model makes the architecture explicit.
- The generated app follows the model wiring.
- Source files are allocated to nodes.
- UI ownership is visible in the project structure.
- The same app can be inspected by a human and manipulated by a coding agent.
That is the useful part of the exercise. Even a small chat app has enough state and message flow to become unclear if everything is implicit in code. vmblu keeps those boundaries visible.